Monday, 13 May 2013

Day 42 - The Final Countdown

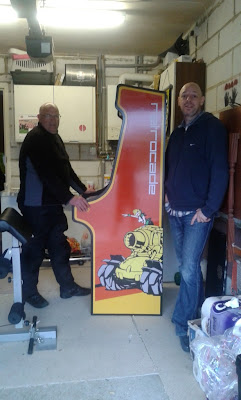
Essentially I've finished. I've some videos to edit/upload and pictures from a previous day (control panel creation/wiring) but I'm too excited so thought I'd pop these up now anyway :)

Thanks to Harry for the extra hands, tools and woodworking skills, Pierre for the tank, lettering and other artistic direction, Calla for the drill press and creation of a LED block, Brian for spraying and everything else, plus a few others....

Feel free to pop round for a game or two of something.


Day 41 - Stuck Art

Tonight we (me and Brian) put the tank stickers on. Easy enough as they were small (and I wasn't doing it). Almost job done, just waiting for the bezel undercoat to dry then it's on with the black paint and tidy up.

Yes, I know it looks like she's pointing at the flipper button (or the Sun).


Of course, it wouldn't be complete without a blatant plug, so visit Brian at http://2wheelsmotorcycletraining.co.uk/ if you need bike training or advanced bike training and happen to live in the north-east of England :)

The bezel was just four pieces of hardboard (about 2mm) stuck together with tape on one side and then glued.

Also, because the stand was the wrong angle and position for the monitor to be viewed nicely I made use of the monitor mount I created originally.


Monday, 6 May 2013

Day 40  - Control Panel Is Born


With the plastic cut yesterday, I cut out the marquee and mounted it. The aluminium is screwed in at the top (for changing/access) and bonded to the wood using contact adhesive at the bottom.


I fitted the pinball buttons (also double as left/right mouse buttons I hope). Rather fetching I think and better than the black I was going to get.


After checking the trackball and buttons fitted I measured and cut out the holes for the joystick into the MDF then cut out about 3mm for the trackball to fit (as it has to span the MDF and the polycarbonate).


After this, I placed the art for the control panel onto the MDF, peeled back the protective cover for the polycarbonate and placed this on top sandwiching the art between the two.

Then just a simple matter of sticking the buttons into the holes, fitting the trackball bezel and trying it out in the cabinet.


There's some videos to be edited for this that will be uploaded shortly.

All that is left is:
1. Put on side-art tanks
2. Wire up control panel
3. Fit glass and monitor with a bezel (no idea yet, probably hardboard)
4. Play games


Day 39 - Polycarbonate

The polycarbonate arrived (I bought 2mm). I bought this as it is supposed to be easier to cut than acrylic but scratches easier. One piece for the control panel and one piece for the two halves of the marquee (the marquee is sandwiched between)

First we taped where the cuts were going, put some thin wood below to strengthen and support it and used the jigsaw with a metal blade to slowly cut the plastic in half. Harry did the cutting as he is a master builder and I was too scared. Remember to keep the backing tape on.


After drilling all the holes (except trackball) into the MDF (18mm)  it was off to Calla's workshop to drill the holes with the 28mm wood spade bit.


First we placed the polycarbonate below the MDF control panel and taped it up tight with gaffer tape, then we placed another piece of MDF below that (making a polycarbonate sandwich) and clamped it. The idea is to stop any vibration when cutting.


We set the drill speed to it's lowest (500rpm) and went slowly through the mdf into the polycarbonate (thereby making everything match up exactly).

Some holes couldn't be done (too far for the drill press to reach), so I did these back home with the hand drill on slow speed. The idea being to go slow but steady resulting in scraping away of the polycarbonate rather then forceful drilling.

While we were there he soldered wires onto my little switches (for pause and power) and showed off his magic tricks by twisting the wires in a drill.

If you're ever in the need for a high quality but cheap guitar pedal (diy or built) then visit him at http://pedalparts.co.uk/, international delivery too :)


This is the finished article (with covering tape on).


Friday, 3 May 2013

Day 38 - Shiny Shiny Stuff

After getting lost by the hapless City Link my art finally turned up and printed.com have done a splendid job. Click to zoom.

This is the marquee done on special back-lit paper:


This contains the two side pieces (tanks from metal slug), the control panel and I had some spare space so created a little something for the monitor bezel (to go at the bottom). The QR-barcodes, you'll just have to scan to see where it takes you :)


Here is the bezel closer up:


Wednesday, 24 April 2013

Day 37 - And Neg said Let There Be Light

Today my stupendous mate who happens to be a guitar pedal designer and fabricator created me a LED block for the trackball (which has space underneath to take a little PCB). Here it is. I've no idea why the lit version is mirrored, it's ok when you look at it from the file explorer. It's a lot brighter with 12v (this was just 9v as a test) and when viewed not from my phone camera.

This plugs straight into a molex from the PC and uses the 12v (yellow) rather than 5v (red) supply meaning half the number of resisters are required. Cost about £2, which is a lot cheaper than the £30 the arcade parts website want :)

All the LED's are in sockets so can be taken out and replaced with any mix of colours - I may end up with yellow, which was the original plan.


Anyway, if you're in need of a guitar pedal (kit or ready made) head over to http://pedalparts.co.uk/

I also got a couple of these very tiny buttons (black version) to be used as the back/escape and power buttons. They should be very inconspicuous, they are about 5mm in diameter and a total of about 13mm. From http://www.rapidonline.com/electronic-components/low-profile-push-switches-30972/ at about 40p each. Lovely solid feel to the press action too.


Sunday, 21 April 2013


Day 35 - Control Panel Done

All the parts arrived. There were a few minor issues to contend with:
  • The trackball Y axis was wired with colours that didn't match the controller PCB (the PCB has three connections - two for trackball and one for a spinner). Problem was if I wired it wrong the spinner is wired differently so could have shorted out. I just traced the wires, matched them to the wiring diagram and it was sorted. 
  • All the spade connectors are 4.8mm but most of the buttons are 2.8 so I'll either have to squash the connectors or get them to send me some replacement switches with the correct sizes.


Through using the temporary panel I found the left joystick was too close to the side so I'll move Player 1 1cm to the right and Player 2 joystick can't fit the spade connectors properly as it hits the trackball so I'll move that 1cm to the right too (there's enough room to not hit the sides).

In case anyone is creating their own u-track and they haven't updated the wiring colours, these are the ones you connect: